Trustlook's Integration with OKC (OKX Chain)
San Jose, California, Oct. 19, 2022, Trustlook, the global leader ...

If you have started reading this article, I guess you already know what EVM stands for. So I wouldn’t spend too much time on the background of Ethereum. If you do need some basics of it, please go ahead google “Ethereum Virtual Machine”. The main goal of these series of articles is to help understanding everything about EVM bytecode in case you will be involved in some work about bytecode level contract audit or develop a decompiler of EVM bytecode.
Now let’s start with some very basic of EVM bytecode. EVM is a stack-based Virtual Machine. If you have experience with any of similar VMs (like Java VM, DVM, .NET VM), you wouldn’t have too much difficulty to understand the basic idea of it. Basically, EVM bytecode is the VM level machine language. You can image these level of code is certainly not for human to read same as low level machine codes. It can be compiled by high level EVM languages. The most popular one would be Solidity for now. To understand EVM bytecodes better, I will use a lot of simple Solidity samples for demo. So let’s start with our very first simple example:
pragma solidity 0.4.25;

contract Demo1 {
  uint public balance;

  function add(uint value) public returns (uint256) {
        balance = balance + value;
        return balance;
    }
}
You may ask why I didn’t use the common HelloWorld as a start example. That is because commonly a HelloWorld example will use a string variable, and for our EVM bytecode, the string variable is a dynamical length variable, and we will get another article to talk about it later. So let’s just start with some a simple Add operation for the very first demo.
To compile this piece of Solidity program, we need a compiler. I really recommend Remix for this job. Remix is not just an online compiler, it also supports a lot of great features you would love. Please visit following link to start using it:
The main GUI of Remix is shown as following photo:
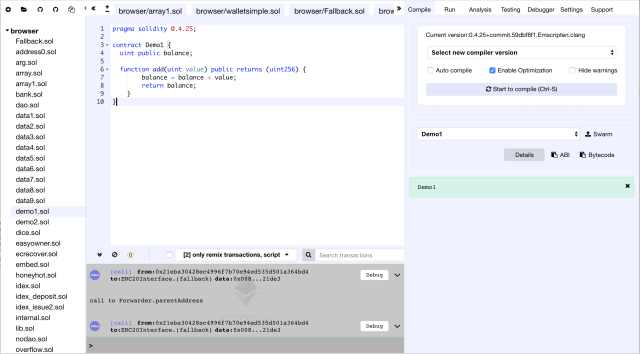
The portal is straightforward to use. On the right column of the page, there are tabs you can select for your interest.
After adding a new file demo1.sol in Remix portal, you can choose the right compiler version from “Compile” tab for the compilation. Here we are using “0.4.25”. When the compilation is done without any errors, you can click on “Details” to get the EVM bytecode from the value of “object” in the “BYTECODE” section of the popped out page.
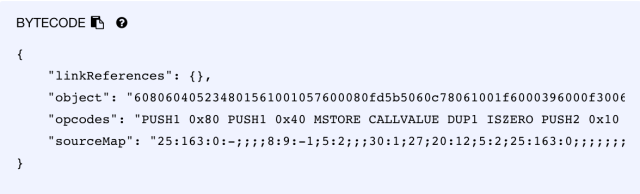
The whole string of it is:
608060405234801561001057600080fd5b5060c78061001f6000396000f3
0060806040526004361060485763ffffffff7c0100000000000000000000
0000000000000000000000000000000000006000350416631003e2d28114
604d578063b69ef8a8146074575b600080fd5b348015605857600080fd5b
5060626004356086565b60408051918252519081900360200190f35b3480
15607f57600080fd5b5060626095565b6000805482019081905591905056
5b600054815600a165627a7a7230582063aa00920d824233ab5307ef3a379
c757bdbee62fe00fe36a5d852c766e58fef0029
At the first glance of the string, you might be just lost, right? But don’t worry we will explore the whole piece of binary string to understand the in and out of it.
First, if you look at the string closely, you will know this is a HEX format string to present a piece of binary. Yes, you are right. The real EVM bytecode is actually a binary string, but in order to show it better to others, it is always be presented in the HEX format. To understand the every byte of the binary characters inside the string, we need to first know some basics of EVM opcodes.
An opcode is a instruction of the EVM. Every opcode itself is a 8bit unsigned integer. For example, 0x00 means STOP, 0x01 means ADD. To understand all meanings of the opcodes, please refer to the Ethereum Yellow Paper at:
https://ethereum.github.io/yellowpaper/paper.pdf
For now, we wouldn’t go through all of the opcodes to explain the meanings. We just need to know the basics of them and explain the new opcodes when we encountered them. So let’s start from the first part of the EVM bytecode we got from Remix to explain:
6080604052
If we mapping all opcode into a readable instructions, we can get following code:
00:  6080 PUSH1 0x80
02:  6040 PUSH1 0x40
04:  52   MSTORE
From above code snippet, we can see 2 opcodes, PUSH1 and MSTORE. PUSH1 means to push 1-byte integer into stack for future use. There are also PUSH2, PUSH3 … until PUSH32. In EVM all integers are from 1-byte to 32-byte long. PUSH family opcodes are the only ones come with operands in EVM bytecode, because for rest of the opcodes they will use the values in the stack. For this example, the first 2 PUSH1 will push 0x80 and 0x40 into the stack, then MSTORE will use the 2 items in the stack for the memory write operation. So the above code snippet is actually the EVM assembler code:
mstore(0x40,0x80)
After MSTORE uses the 2 items in the stack, they will be popped out. Commonly the result of the opcode will be pushed into the stack for later use. However MSTORE does not have a return value, so it will not push anything into the stack.
So in this way if you keep going through the whole EVM bytecode Remix returned to us, you will get the whole list of opcodes. But before we go further to explore more opcodes, let’s talk about 2 more concepts in the EVM environment, memory and storage.
Memory is a readable and writable structure designed for hash calculation and external calls or returns. Memory is reset as stack whenever the EVM starts. The difference from stack is that memory can be accessed by address. For the earlier example, MSTORE will save the specified value 0x80 into the according address 0x40. You might wonder the meaning of this action. Actually, address 0x40 in EVM memory is reserved for the “free memory pointer”, so when the EVM code needs to use some memory, it will get the free memory pointer from 0x40. Also, if you don’t want that memory be overflowed by future operation, you need to update the value in 0x40 so future operation will not use the same memory again.
Other than memory and stack, storage variables are the ones which hold states. So storage variables won’t be reset every time EVM restarts. You can consider storage as a dictionary or hash table. Everything changed in storage will be recorded in the world states of Ethereum ecosystem. Storage related opcodes are SLOAD and SSTORE. We will talk more about storage variables when analyzing more complicated structures like mappings or arrays.
Based on these information, let’s continue on the bytecode string.
05: 34     CALLVALUE
06: 80     DUP1
07: 15     ISZERO
08: 61     PUSH2 0x0010
0B: 57     JUMPI
0C: 6000   PUSH1 0x00
0E: 80     DUP1
0F: FD     REVERT
10: 5B     JUMPDEST
11: 50     POP
12: 60C7   PUSH1 0xc7
14: 80     DUP1
15: 61001F PUSH2 0x001f
18: 60     PUSH1 0x00
1A: 39     CODECOPY
1B: 60     PUSH1 0x00
1D: F3     RETURN
1E: 00     STOP
This code snippet is a bit long, but don’t worry about it. Let’s go through it from step by step. CALLVALUE will push msg.value into the stack, then DUP1 will duplicate that value on the stack and check it whether it is 0 or not by using ISZERO. If the value ISZERO got from stack is 0, this opcode will push a TRUE into the stack for next instructions. The next PUSH2 will push a code address 0x0010 into the stack for JUMPI. JUMPI is a conditional jump instruction which uses 2 items from the stack. One is for the condition result, and the other is for the jump address. If the condition (in this case, it is the ISZERO(msg.value)) is satisfied the execution will jump to 0x0010, otherwise the code will end with REVERT(0,0). So the bytecode from address 0x05-0x0F can be transferred to following equivalent Solidity code:
if(msg.value != 0) revert();
The reason why we didn’t see this line in our original Solidity code is because this check was injected by compiler for non-payable functions.
To continue on the later part of the bytecode, if you arrange the stack manually, you can see there is an instruction CODECOPY(0x0,0x001F,0xC7). It means it will copy 0xC7 bytes code from offset 0x1F into memory (0x0, 0xC7). Then the code will call RETURN(0x0,0xC7) to hand the copied data back to EVM. Until now you might have guessed out the logic of this operation and what is the functionality of this piece of bytecode.
Apparently, the whole piece of bytecode generated from Remix compiler has multiple parts. The set from 0-0x1E is the creation part of the contract. This code will be only called during the smart contract creation. It will call the constructor of the contract and also copy the runtime part of code to EVM for creation. After the contract account is created, then the runtime part of code from 0x1F-(0x1F+0xC7) will be called for future transactions on this contract and the constructor function will not be called anymore. Also, you might have found that in the creation part of the bytecode, this is no any JUMP or JUMPIinstructions to make the execution into the runtime part bytecode.
To prove what we guess is correct, let’s make another Solidity code with a constructor function:
pragma solidity 0.4.25;

contract Demo2 {
  uint public balance;

  function add(uint value) public returns (uint256) {
      balance = balance + value;
      return balance;
  }

  constructor (uint value) public {
      balance = value;
  }
}
After compiling it with Remix, we can get the creation part of the bytecode as following:
608060405234801561001057600080fd5b506040516020806100fa833981016040
525160005560c7806100336000396000f300
Apparently the code is longer than the previous one since we defined a constructor function there. So let’s disassemble the opcode into more readable codes:
0000    60  PUSH1 0x80
0002    60  PUSH1 0x40
0004    52  MSTORE
0005    34  CALLVALUE
0006    80  DUP1
0007    15  ISZERO
0008    61  PUSH2 0x0010
000B    57  JUMPI
000C    60  PUSH1 0x00
000E    80  DUP1
000F    FD  REVERT
0010    5B  JUMPDEST
0011    50  POP
0012    60  PUSH1 0x40
0014    51  MLOAD
0015    60  PUSH1 0x20
0017    80  DUP1
0018    61  PUSH2 0x00fa
001B    83  DUP4
001C    39  CODECOPY
001D    81  DUP2
001E    01  ADD
001F    60  PUSH1 0x40
0021    52  MSTORE
0022    51  MLOAD
0023    60  PUSH1 0x00
0025    55  SSTORE
0026    60  PUSH1 0xc7
0028    80  DUP1
0029    61  PUSH2 0x0033
002C    60  PUSH1 0x00
002E    39  CODECOPY
002F    60  PUSH1 0x00
0031    F3  RETURN
0032    00  STOP
We can see some similar code set at the start and end. But the code set between 0x12 and 0x25 are new. So let’s focus on this new part. First, in opcode set 0x12 and 0x14, MLOAD(0x40) was called to get the value from memory at address 0x40. From previous section, we already knew the address 0x40 in memory holds the free memory pointer in EVM. In this case it is 0x80. Then after arranging the stack by using PUSH and DUP, it will have [… 0x20, 0x00FA, 0x80] in stack before calling CODECOPY. So the code will call CODECOPY(0x80, 0x00FA, 0x20). Apparently, this action didn’t show in previous demo bytecode. It has something to do with the new code we put inside the constructor function. It copies the last 32 bytes data from code into the free memory address. It is likely the parameter value during the deployment of the contract. Let’s keep going on the later bytecode.
In the instructions set of 0x1D – 0x21, the code added 0x20 to the current free memory pointer 0x80, and save it back to the address 0x40 by using MSTORE(0x40, 0x80+0x20).
Then the instruction at 0x22 will push the value returned by MLOAD(0x80)into the stack, which is the 32-byte value copied from the code. The later code at 0x23, 0x25 will save the value into the storage offset 0x0 using SSTORE(0x0, MLOAD(0x80)). So in summary, the instructions between 0x12 and 0x25 are basically doing some operation like:
SSTORE(0x0,CODECOPY(0x80, 0x00FA, 0x20))
Apparently, during the deployment of a new contract, the initialized parameters are specified at the end of EVM bytecode in the transaction data payload. Then in the process of creation, the constructor function will get the the parameter by using CODECOPY.
So far, we have talked the basics of EVM bytecode, including the three types of data structures in EVM: stack, memory and storage, some regular opcodes involved in the smart contract creation, how constructor parameters were transferred, and the structure of compiled EVM bytecode. In next section we will talk about the runtime part of the bytecode.
Understand EVM bytecode – Part 2
PS, We have published our online EVM decompiler to everyone. Please feel free to use it. Any comments are welcome.